Learn how to draw a great looking Cartoon Car with easy drawing instructions and video tutorial.
By following the simple steps, you too can easily draw a perfect Cartoon Car.
Step-by-Step Instructions for Drawing a Cartoon Car

How to Draw a Great Looking Cartoon Car for Kids and Beginners - Step 1

Begin by drawing a horizontal, curved line.
Drawing Step 2

Draw another curved line on top of the first to create an enclosed shape.
Unlock AD FREE and PRINTABLE drawing and coloring tutorials
- 1,900+ drawing & coloring PDFs
- 50+ ebooks
- Ad-free website
Drawing Step 3

Draw a short curved line downwards from where the original lines connect. On the other side, draw a longer, more rounded curved line from the corresponding point.
Drawing Step 4

Enclose the shape by drawing a long, curved line. This will form the car's body.
Drawing Step 5

Draw a short, horizontal curved line where the top of the car meets the body.
Drawing Step 6

Outline the wheels on the left side of the car. Do this by drawing two half circles on the lower portion of the car's body.
Drawing Step 7

Erase guide lines from the wheels and from where the bottom and top of the car meet.
Drawing Step 8

Draw the windows. Draw two curved lines to enclose two rounded rectangular shapes within the car's top.
Drawing Step 9
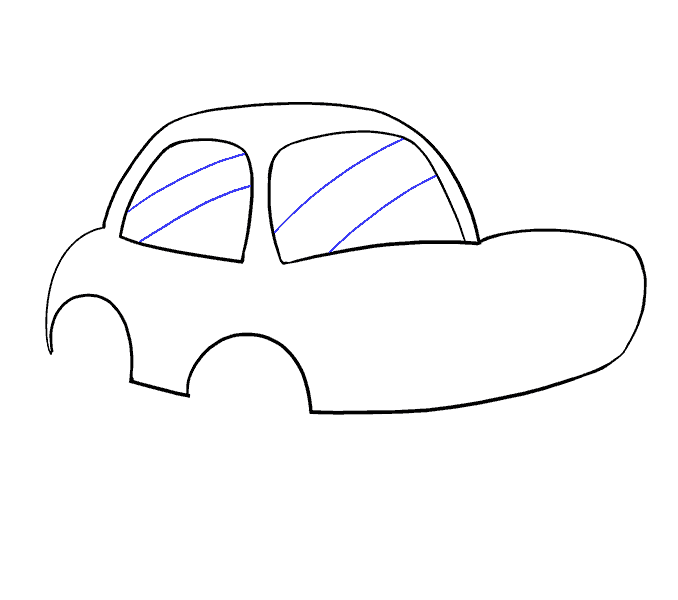
Add details to the windows by drawing two curved, parallel lines across each. When complete, this will look like reflections on the windows.
Drawing Step 10

Draw the wheels. Draw two complete circles on the left side of the car. For the far wheel, draw a half-circle beneath the car's front.
Drawing Step 11

Give the tires some dimensions. Do this by drawing a curved line to the right of each tire. This produces a three dimensional effect. Also, draw the rear bumper using a short, curved line.
Drawing Step 12

Draw the hubcaps by placing a smaller circle within each wheel.
Drawing Step 13

Add detail to the body of the car. Draw two curved lines extending from the front windshield to outline the hood. Draw two more curved lines extending downward from the left window to outline the door, and draw a teardrop shape for the door handle. Draw curves around each of the wheels.
Drawing Step 14

Draw the front bumper. Begin with a curved line just inside the body of the car, and use a second curved line to produce a rounded rectangular shape.
Drawing Step 15

Erase the guide lines from within the bumper.
Drawing Step 16

To draw headlights, place two circles above the bumper.
Drawing Step 17

Draw a smaller circle within each circle. Add depth to the bumper using a long, horizontal curved line and a short, vertical curved line.
Drawing Step 18

Now, you can give the car a face. Draw another, smaller circle within each headlight circle. The headlights will serve as the eyes. Draw a mouth between the eyes using two "U" shaped curved lines.
Drawing Step 19

Within each eye circle, draw two more circles. Shade the innermost circle. Draw two curved lines within the mouth, one on top and one on the bottom. Shade between these lines.
Drawing Step 20

Color your cartoon car.
For more great Cartoons drawing tutorials, see the 51 Cartoons Drawing Ideas for Kids post.
Watch 'How to Draw a Cartoon Car' Video Tutorial

Learn More About The Cartoon Car Drawing
The modern automobile was invented in the late 1800s. Ever since, the car has been a beloved part of our technological culture.
It wasn't long before cartoonists were personifying cars and other vehicles by giving them eyes, mouths, and personalities of their own. This type of image has become increasingly popular since the release of Disney's feature film Cars in 2006.
Would you like to be able to draw your very own cute cartoon car? Now you can, using this easy, step-by-step drawing tutorial.
Scroll down for a downloadable PDF of this tutorial.
All you will need to draw a cartoon car is a piece of paper and a pencil, pen, or marker. You may also want to have some crayons, colored pencils, or markers handy to color your finished drawing.
As you follow the step-by-step drawing guide, you will notice that each step is accompanied by an illustration. In the picture, new lines added in that step are highlighted in blue. Sketch lightly at first, as you will likely need to erase some of your early lines before you finish the drawing.
It's time to put the pedal to the medal and draw a cartoon car. Gentlemen, start your engines...ready, set, go!
If you liked this drawing tutorial, see also the following guides: Boat drawing, Train drawing, and Monster Truck drawing.
Cartoon Car Drawing Tutorial - Easy & Fun Printable Pages
Join now and get immediate access to thousands of printable drawing instruction and practice pages!

Learn how to get access to thousands of printable pages!

MEMBER TROUBLESHOOTING
Still seeing ads or not being able to download the PDF?
First, check that you're logged in. You can log in on the member login page.
If you're still not able to download the PDF, the likely solution is to reload the page.
You can do this by clicking the browser reload button.
It is a circular arrow-shaped icon at the top of the browser window, typically found in the upper-left side (you can also use keyboard shortcuts: Ctrl+R on PC and Command+R on Mac).
See a Google Web Story of this Cartoon Car Drawing Tutorial.