Learn how to draw a great looking Weathervane with easy drawing instructions and video tutorial.
By following the simple steps, you too can easily draw a perfect Weathervane.
Step-by-Step Instructions for Drawing a Weathervane

How to Draw a Great Looking Weathervane for Kids and Beginners - Step 1

1. Begin the weathervane outline by drawing a circle. Then, extend straight, parallel lines from its top and bottom. This is the rod supporting the weathervane.
Drawing Step 2

2. From the circle, extend pairs of straight lines diagonally on each side, erasing as necessary and forming a cross or "t" shape.
Unlock AD FREE and PRINTABLE drawing and coloring tutorials
- 1,900+ drawing & coloring PDFs
- 50+ ebooks
- Ad-free website
Drawing Step 3

3. Draw pairs of straight lines on each side of the circle, traveling in the opposite diagonal direction.
Drawing Step 4

4. These arms help you determine which way the wind is blowing. Identify the arms by drawing the letters "N," "W," "S," and "E" (for north, south, east, and west).
If you need help determining where each letter should go, check out how to draw a compass rose.
Drawing Step 5

5. Draw two horizontal parallel lines at the top of the rod, and connect them on each end. This will be the shaft of the arrow that points in the direction that the wind is blowing.
Drawing Step 6

6. On one end, draw a triangle to represent the arrowhead. On the other, use straight and curved lines to sketch a shape like an open book.
Want to learn more about drawing arrow shapes? Check out this bow and arrow drawing guide.
Drawing Step 7

7. Next, draw the rooster on top of the weather vane. Extend a long curved line upward. Then use curved lines to enclose the pointed beak and rounded wattle.
Tip: Check out this rooster drawing guide if you wish to make yours a really detailed animal.
Add More Details to Your Weathervane Picture - Step 8

8. Use curved lines to sketch the head, the comb on top of the head, the wing, its feathers, and the feathers at the base of the neck. Shade a circle within a circle to form the eye and pupil.
Complete the Outline of Your Weathervane Drawing - Step 9

9. Use a curved line to enclose another portion of the wing. Then, extend a long curved line to draw the tail and back of the legs. Cause the line to double back upon itself many times to create the long tail feathers.
Color Your Weathervane Drawing
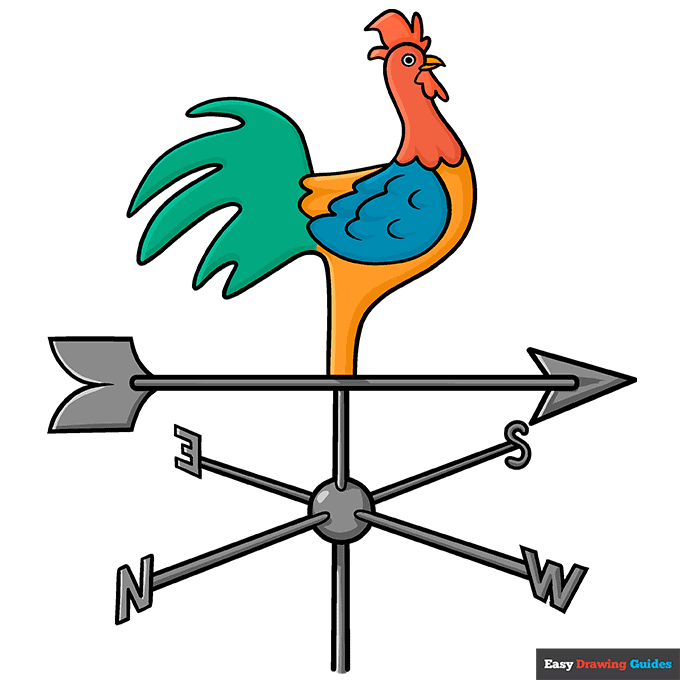
Your weathervane outline is now complete. We've shaded ours like gray metal with a colorful bird on top.
Other metal colors might include gold, black, red (for rusty metal), brown (copper or bronze), or even green (for aged copper with a patina).
For more great man-made objects drawing tutorials, see the collection of Simple How to Draw Man-Made Objects Ideas.
Watch 'How to Draw a Weathervane' Video Tutorial

Learn More About The Weathervane Drawing
You can learn how to make a classic weathervane drawing with the help of this easy, step-by-step object drawing tutorial.
This drawing involves a lot of straight lines. It also combines a compass, an arrow, and a chicken into a single object.
How will you use this weathervane drawing? You could use it in your science project about the weather. Or, you might include it when illustrating stories that involve wind.
Scroll down for a downloadable PDF of this tutorial.
For example, weathervanes provided visual symbolism for wind and storms in films as different as Twister and The Wizard of Oz. You can learn how to draw wind and add it to your drawing.
In some places, weathervanes like the one pictured are called weathercocks, because they are decorated with a cock or rooster on top.
For more easy and fun guides, see the How to Draw a Realistic Skull or Food Chain Drawing tutorials.
Weathervane Drawing Tutorial - Easy & Fun Printable Pages
Join now and get immediate access to thousands of printable drawing instruction and practice pages!

Learn how to get access to thousands of printable pages!

MEMBER TROUBLESHOOTING
Still seeing ads or not being able to download the PDF?
First, check that you're logged in. You can log in on the member login page.
If you're still not able to download the PDF, the likely solution is to reload the page.
You can do this by clicking the browser reload button.
It is a circular arrow-shaped icon at the top of the browser window, typically found in the upper-left side (you can also use keyboard shortcuts: Ctrl+R on PC and Command+R on Mac).