Learn how to draw a great looking Charizard with easy drawing instructions and video tutorial.
By following the simple steps, you too can easily draw a perfect Charizard.
Step-by-Step Instructions for Drawing Charizard

How to Draw a Great Looking Charizard for Kids and Beginners - Step 1

Begin by drawing a small circle in the middle of your page. This will form the head.
Drawing Step 2

Next, draw two highly curved lines on the top of the head. These will form the horns.
Unlock AD FREE and PRINTABLE drawing and coloring tutorials
- 1,900+ drawing & coloring PDFs
- 50+ ebooks
- Ad-free website
Drawing Step 3

Begin to detail the face by drawing a vertical curved line in the center of the circle, and two more curved lines on the right of the circle.
Drawing Step 4

Form the snout by extending a curved line from the bottom of the circle, and connecting it with the curved line you drew within the right side of the circle. Draw another curved line at the end of the snout.
Drawing Step 5

To form the jaw, draw a curved line from the base of the left horn to the tip of the snout.
Drawing Step 6

Erase the guide lines. These include the original circle and the line crossing the snout.
Drawing Step 7

Draw the neck. Draw two curved lines extending from the bottom of the head, then connect these at the bottom using a shorter curved line.
Drawing Step 8
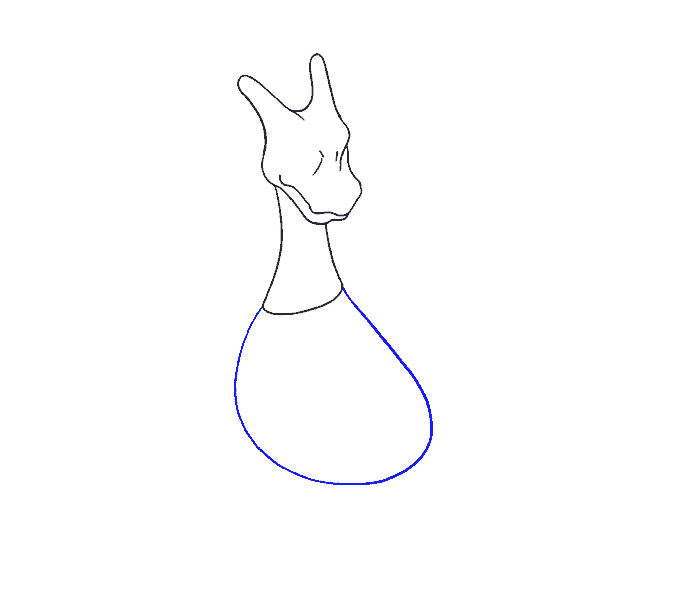
Draw a roughly circular shape below the neck. This will form the body.
Drawing Step 9

Sketch in the arms and legs. The left arm consists of two curved lines extending from the body. The right arm is drawn using four curved lines that intersect the body and neck. For the lower legs, draw each using two curved lines.
Drawing Step 10

Draw a circle at the end of each arm. This will form the hand. For each foot, connect the two sides of the leg using a bulbous, curving line.
Drawing Step 11

Draw three claws on each foot. To draw a claw, extend two curved lines from the foot. The lines will meet in a point. Connect the lines on the other end using a short, curved line. Each claw will resemble a curved triangle with a rounded base.
Drawing Step 12

Erase the guide lines that cross the claws, leg, and arm.
Drawing Step 13

Draw three claws on each hand. Begin each claw by drawing a curved line that begins on the outside of the hand circle, curves outward, and ends within the circle. Then, draw a second, shorter curved line from the midpoint of the first, ending within the circle. Finally, connect the two line ends with a short, curved line. Also, draw a curved line through the middle of the hand to add detail.
Drawing Step 14

Erase the guide lines from the hands.
Drawing Step 15

Draw the tail by extending a curved line from the leg and from the foot, meeting in a point. Finish the tail by adding another curved line between the body and the foot.
Drawing Step 16

Draw a curved line from the left side of the body to the right leg. This details the belly. Draw a flame at the end of the tail. Begin on one side of the tail tip, drawing a squiggly, jagged line. End the line at the other side of the tail tip.
Drawing Step 17

Add detail to the tail by drawing a curved line.
Drawing Step 18

Draw the wings. For each wing, extend a wavy line up from the shoulders, then curve it outwards and down. Draw a similar wavy line beneath the first. Repeat on the opposite side. Draw the eye using two curved lines. For the nose, draw two short, curved lines at the tip of the snout, and draw a longer wavy line above the left nostril. Draw a triangular tooth at the edge of the mouth.
Drawing Step 19

Draw a curved, "M" shaped line to connect each wing tip to the back. Detail the wings using two curved, vertical lines on each. Complete each eye using a curved line, a small circle, and a dot.
Drawing Step 20

Erase the guide line from the neck.
Drawing Step 21

Color your Charizard. To color him in the classic style, shade his body orange, his wings and eyes teal, his belly light yellow, and his tail flame bright yellow. The claws may remain white.
For more great Dragon drawing tutorials, see the 50 Easy Dragon Drawing Tutorials post.
Watch 'How to Draw Charizard' Video Tutorial

Learn More About The Charizard Drawing
Would you like to draw Charizard Pokémon?
Ever since its video game release in 1996 and the anime series debut in 1998, Pokémon has been popular among children, teenagers, and adults.
The character Charizard adds humanity's centuries-long fascination with dragons to this exciting world.
To draw your own Charizard, follow this easy, step-by-step drawing tutorial.
All you will need is a piece of paper and something with which to draw. You may also want to use crayons, colored pencils, or markers to color your work.
Scroll down for a downloadable PDF of this tutorial.
In each illustration, new lines are highlighted in blue. Draw your lines lightly at first, as you will be erasing many to complete your drawing.
Are you ready to begin your Pokémon adventure? Charizard, I choose you!
The 18 Easy Pokémon Drawing Tutorials post has more easy Pokémon drawings that you can make.
If you liked this drawing tutorial, see also the following guides: Pikachu drawing, Charmander drawing, and Pichu drawing.
Charizard Drawing Tutorial - Easy & Fun Printable Pages
Join now and get immediate access to thousands of printable drawing instruction and practice pages!

Learn how to get access to thousands of printable pages!

MEMBER TROUBLESHOOTING
Still seeing ads or not being able to download the PDF?
First, check that you're logged in. You can log in on the member login page.
If you're still not able to download the PDF, the likely solution is to reload the page.
You can do this by clicking the browser reload button.
It is a circular arrow-shaped icon at the top of the browser window, typically found in the upper-left side (you can also use keyboard shortcuts: Ctrl+R on PC and Command+R on Mac).
See a Google Web Story of this Charizard Pokémon Drawing Tutorial.